The mess usually shows up at the worst moment. A technician is pulling retired laptops for secure wiping, finance wants an audit trail for surplus servers, and someone in the warehouse has three nearly identical asset tags that all seem to point to different records. That's where an inventory labeling system stops being a convenience and becomes the difference between controlled ITAD and expensive guesswork.
A strong labeling setup gives every device a stable identity from procurement through decommissioning. It also supports secure data destruction, cleaner handoffs to recycling partners, and fewer mistakes when equipment moves between storage, active use, and disposal. For teams that care about IT asset disposition (ITAD), the label is the thread that keeps the whole lifecycle intact, including responsible recycling through partners like Reworx Recycling.
Why Your IT Assets Need a Proper Labeling System
A disorganized asset room rarely looks dramatic at first. It looks like a few unlabeled docks, a stack of old monitors, and a tray of laptops with tags that faded or peeled off during a move. Then an audit starts, a service ticket gets assigned to the wrong serial number, and the team discovers that the record of what was wiped, reused, donated, or recycled is incomplete.

The operational risk is bigger than clutter
Poor labeling creates three kinds of problems. First, it breaks visibility, because staff can't tell which device is which without opening it, moving it, or manually checking notes. Second, it weakens control during IT equipment disposal, because unlabeled assets can slip through decommissioning without the right disposition record. Third, it creates a security gap, since a device that can't be tied back to a clear owner or process is harder to prove clean before release.
That matters in ITAD transitions, where the asset has to move cleanly from active use to computer recycling, resale, redeployment, or destruction. A label that survives the process helps answer the questions auditors and internal stakeholders always ask, what is it, where was it used, and what happened to it next. The older history of labeling shows why this works so well, labels evolved for ownership, traceability, and product description long before modern software existed, from ancient Egypt through medieval guild marks and into industrial printing and self-adhesive tags in the twentieth century, as described in the history of labels.
Practical rule: if a tag can't survive storage, handling, and transfer, it won't survive an ITAD workflow either.
For teams managing mixed environments, it helps to think of labeling as the control layer beneath every other process. The label is what links a physical device to an ITAM record, a data destruction event, or a donation decision. That's why Reworx Recycling's own best practices for inventory management are useful reading for teams that want the asset record to stay intact all the way to retirement.
If your organization handles medical carts, mobile shelves, or other moving equipment, the same principle applies. A practical resource like browse medical mobile shelves is a reminder that physical layout affects labeling success just as much as software does.
Choosing Between Barcode, QR Code, and RFID Labels
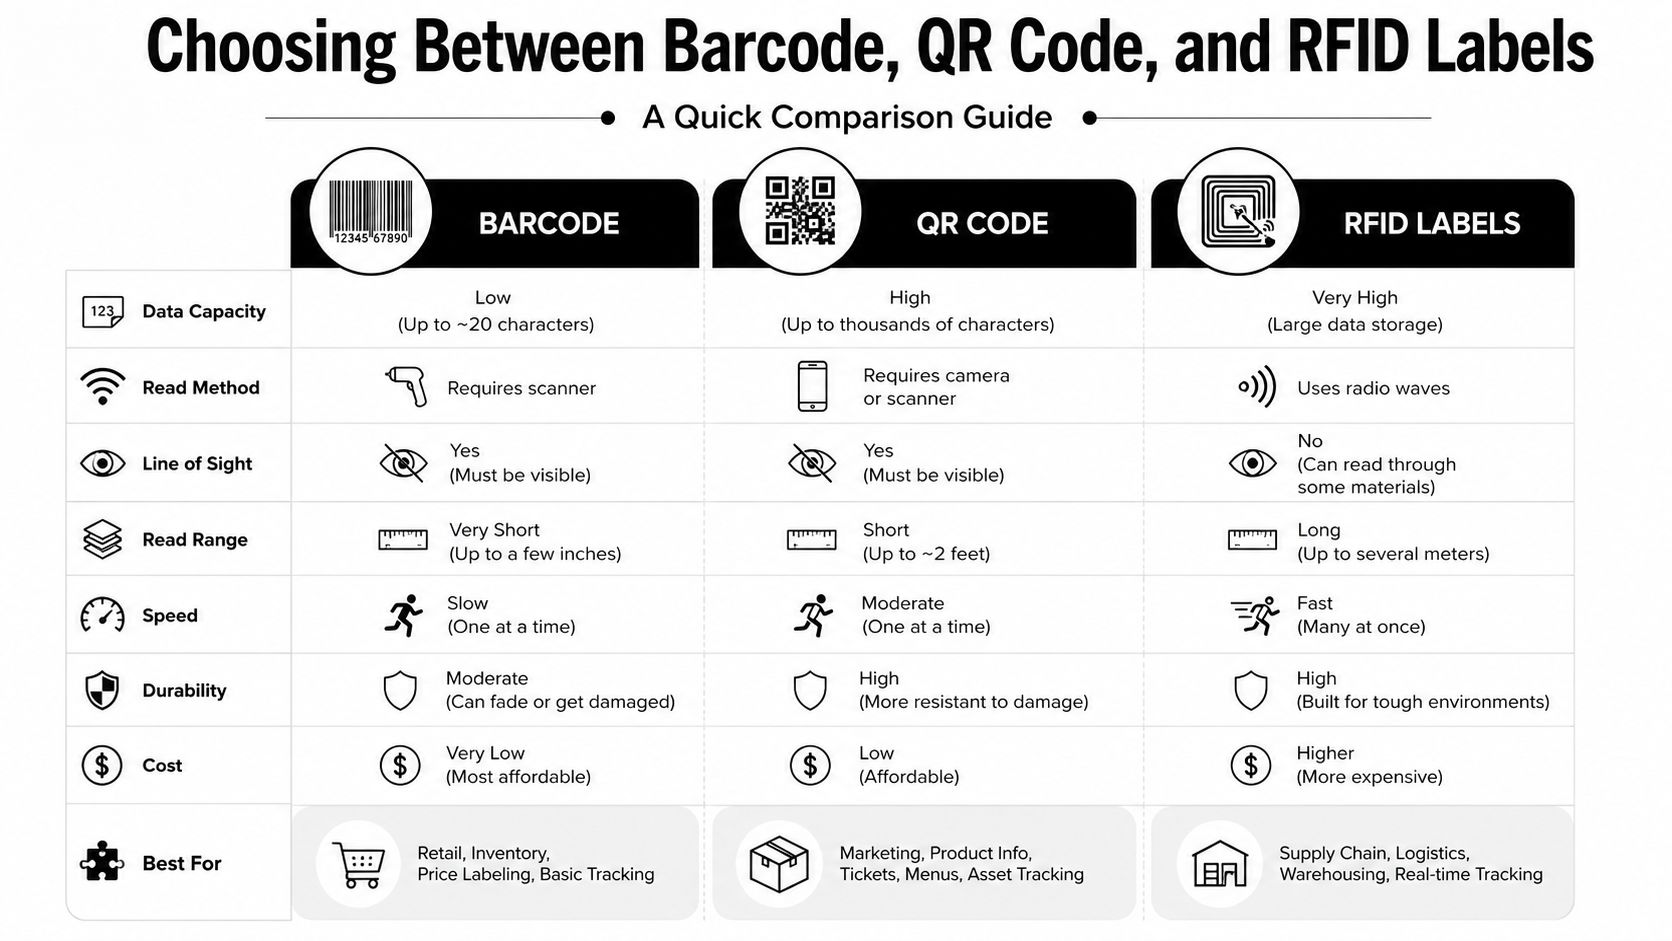
Label technology choice is mostly a trade-off between simplicity, data density, and automation. In many IT environments, a basic barcode is enough for fast scanning and clear identity control. QR codes help when you need more readable data in a compact footprint, while RFID becomes useful when the workflow depends on bulk tracking rather than one-at-a-time scans.
What to choose in real IT environments
A linear barcode works well for standard asset tags on laptops, monitors, and peripherals because staff can scan them quickly and the label stays easy to read. QR codes are stronger when you want to encode a bit more context, such as a URL to the asset record or a longer identifier set. RFID makes sense when visibility has to happen at scale, especially in dense storage environments where items are moved often and scanning each one manually slows the team down.
The trade-off gets sharper around surfaces and handling. Barcodes and QR codes still need a clear line of sight, while RFID can behave differently on metal and in mixed-material environments. For practical context on where RFID adds value in dense site operations, the discussion in RFID navigation for retail sites is useful even outside retail, because the same logic applies to high-throughput tracking.
| Technology | Scan Distance | Cost Per Label | Durability | Best For |
|---|---|---|---|---|
| Barcode | Short, direct scan | Lower | Good when printed and placed correctly | Laptops, monitors, standard asset tags |
| QR Code | Short to moderate, direct scan | Lower | Good when the print is sharp and the surface is stable | Records with more data, compact tags |
| RFID | Longer, depends on reader and environment | Higher | Strong when engineered for the asset and adhesive fit | High-volume inventory movement, gated workflows |
The right answer depends on the workflow, not the trend. If your team needs to identify a device in seconds and keep the label readable for a human backup check, barcode or QR is often enough. If your operation is moving racks of gear, staging large decommissions, or tracking assets through warehouse-like zones, RFID can justify the extra complexity.
For teams setting up a tagged asset program, Reworx Recycling's asset tagging system is a relevant reference point because it ties labeling to downstream handling instead of treating tags as decorative stickers.
Setting Up Your Labeling System Foundation
A labeling system fails when the basics are inconsistent. The most common mistake I see is teams picking a label format before they agree on naming, placement, and hardware. That produces records that look organized in software but fall apart the moment a technician scans a scratched tag in a noisy server room.
Build one naming scheme and stick to it
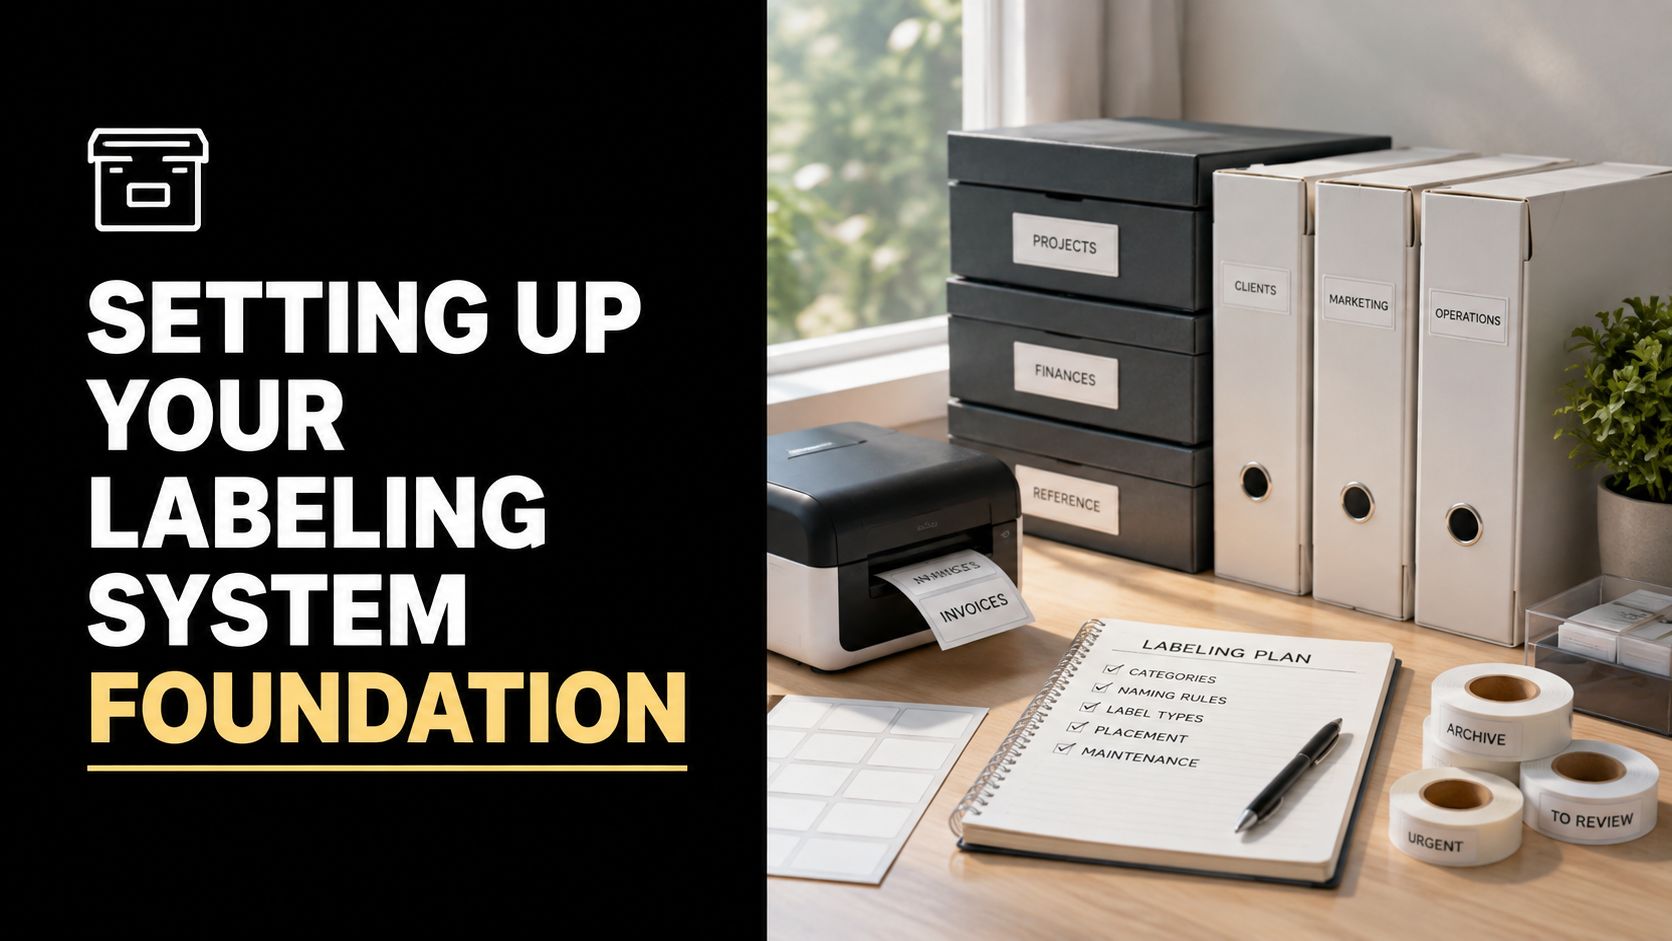
Start with a naming structure that can survive growth. Asset IDs should be unambiguous, easy to read, and consistent across laptops, servers, networking gear, and mobile devices. If one department uses location first and another uses device type first, your scanning data becomes messy fast.
A workable convention separates identity from description. For example, the asset tag can point to the record, while the printed label also carries the model, location code, or owner field if that helps the technician verify the device at a glance. Reworx Recycling's asset tracking systems are relevant here because the same structure that helps active IT tracking also supports end-of-life control.
Match the label to the surface and environment
Material choice matters more than teams expect. A label that performs on a smooth laptop lid may fail on a curved docking station, a metal server chassis, or a cabinet that gets wiped down frequently. The practical rule is simple, verify surface fit, environment fit, scan-path fit, adhesive fit, and fallback readability before you commit.
Labels should still tell the truth when the code is scratched, because the human-readable text is your backup when the scanner fails.
That's why placement is part of design, not an afterthought. Put the code where it can be seen without moving cables, rails, or brackets. Test how it looks under real lighting, from the angle your staff use, and after normal handling. If the code hides under a cable bundle, the system has already weakened.
Pair printer and scanner quality with the label type
Hardware selection should match the chosen label format. A sharp print on the wrong substrate still fails in the field, and a good scanner cannot rescue a label that was printed too small or placed badly. The goal is a readable, durable tag that staff trust enough to scan every time.
A simple way to protect the standard is to keep one approved template version per asset class. That discipline stops field teams from improvising, which is where label quality usually starts to drift.
Integrating Your Labeling System with ITAM and ITAD Workflows
The label only matters when it connects to the rest of the process. In a working environment, an asset tag should point to the ITAM record, procurement history, service status, and the end-of-life decision. That connection turns a label from a simple identifier into a workflow trigger that staff can use without guessing.
Make the asset record do the heavy lifting
When a scan opens the correct item in ITAM, staff spend less time matching records and more time moving equipment through the right process. That matters during refresh cycles, when a device may need repair, redeployment, secure wiping, resale, or recycling. If the tag and record drift apart, the organization loses confidence in the disposition trail and starts relying on manual checks.
The practical approach is to keep labeling data aligned with the same fields your ITAD process needs. That usually means stable identifiers, current location, status, and a clear disposition path. If your team needs a clearer bridge between active tracking and retirement handling, review what is IT asset disposition before you lock in the workflow.
Security and compliance depend on the handoff
The label itself doesn't destroy data, but it supports the proof chain around secure data destruction. A device marked for wiping needs to be traceable from removal through processing, especially when multiple teams touch it. That traceability helps internal stakeholders confirm that the right asset reached the right disposition step and that the handoff was recorded cleanly.
Control point: if the label does not survive the transfer from IT to disposal, your audit trail starts leaking.
A well-run workflow also reduces the chance that a device gets stranded between departments. Procurement, operations, and disposal teams should all recognize the same asset identity, even if they use different software. The same discipline shows up in automating farm purchase orders, where clean handoffs depend on consistent source records. Inventory labeling works the same way, inconsistent identifiers create confusion at every transfer point.
For sustainability leaders, the payoff is stronger end-of-life routing. Once the label supports an accurate record, the organization can send reusable hardware toward refurbishment, and unrecoverable equipment toward responsible recycling instead of defaulting to a vague offload process.
Testing, Rollout, and Your Implementation Checklist
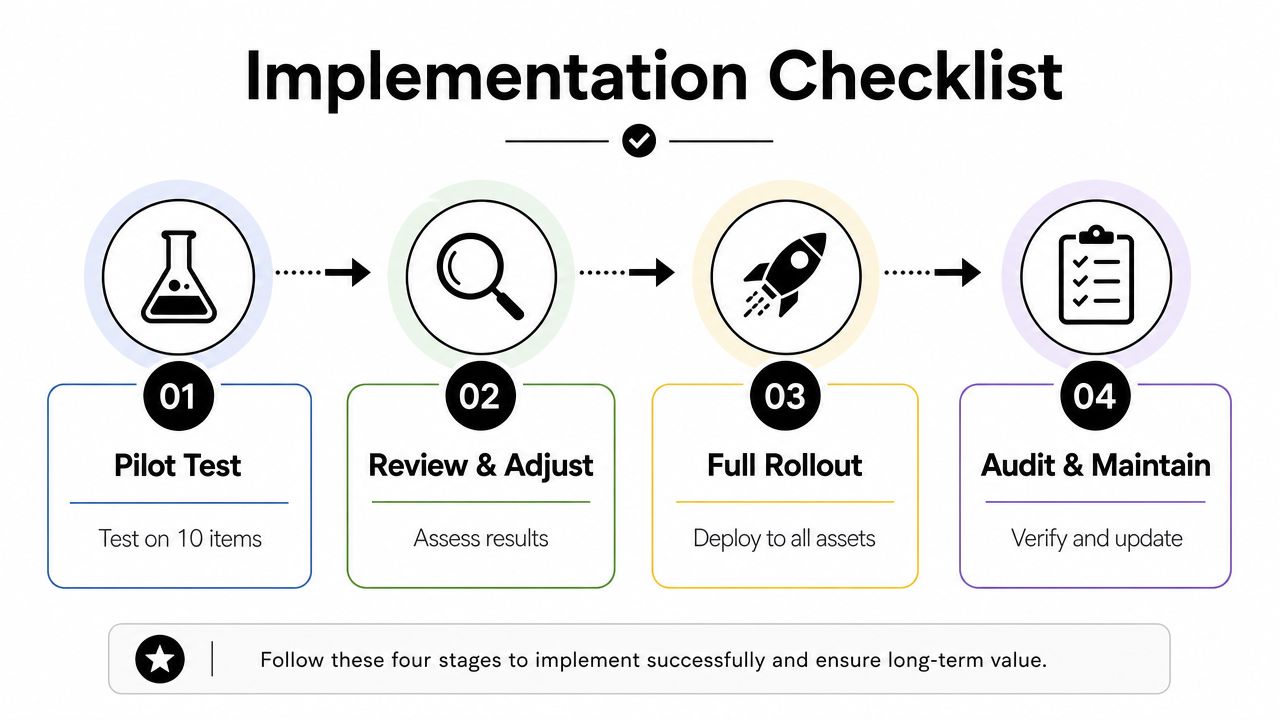
The fastest way to break a labeling project is to launch it everywhere at once. Successful teams pilot the system on a narrow group of assets, verify the labels in live conditions, then expand by zone or department. That keeps mistakes small enough to correct before they become policy.
Test the label where it will actually live
Don't treat a desktop print test as proof. Verify readability under the lighting your team uses, on the surfaces your devices have, and after normal handling. The labelmaker guide stresses pilot printing and live-condition testing before rollout, and that's the right sequence for any environment where labels face wear, movement, or mixed hardware inventory labeling system guide.
Scan accuracy should be checked in the same conditions. If a tag works only when held flat under ideal light, it isn't ready. If the human-readable text still allows a technician to identify the device when a barcode is partly damaged, you've built the right fallback.
Use a staged rollout checklist
A clean rollout tends to follow four control points:
- Pilot test: apply labels to a small batch of representative assets and confirm scan behavior.
- Review and adjust: fix placement, template, or printer settings before expanding.
- Full rollout: deploy by room, rack, department, or asset class instead of all at once.
- Audit and maintain: spot-check records, replace damaged tags, and keep the template version locked.
That same staged logic is what the compliance checklist template helps teams formalize when they need a repeatable approval path.
The checklist matters because a label rollout is really a behavior change. Staff need to know where to place the tag, which record it updates, and what to do if a code won't scan. If that training happens before broad deployment, the process gets adopted faster and with fewer exceptions.
Printable implementation checklist
- Confirm naming rules: one approved asset ID standard, one label template, one placement rule per asset class.
- Match materials to environment: confirm surface fit, wipe resistance, and adhesive strength for each device type.
- Validate hardware: verify printer resolution and scanner compatibility with the chosen label format.
- Test in the field: use real lighting, real handling, and real storage conditions.
- Document the process: keep the approved version locked and note who can change it.
- Train the team: make sure IT, facilities, and disposal staff all use the same workflow.
- Audit after launch: spot-check records against physical assets and replace weak tags early.
Common Implementation Mistakes and How to Avoid Them
Most bad labeling systems don't fail because the team chose the wrong scanner. They fail because the workflow drifted. The three patterns I see most often are inconsistent naming, poor placement, and a label that can't survive the environment it was assigned to.
Inconsistent naming breaks records first
If one team labels a laptop by serial number, another by department code, and a third by location, you end up with duplicate records and unclear ownership. The fix is to choose one convention and enforce it everywhere, including temporary storage and disposal staging areas. Without that discipline, every scan becomes a reconciliation task.
Placement problems are usually self-inflicted
A label hidden behind cables, rails, or mounting hardware is effectively missing. You'll see staff tilting devices, lifting racks, or skipping the scan altogether because the tag is annoying to reach. That behavior spreads quickly, and once people stop trusting the placement, the system loses its value.
Environment mismatch creates chronic failures
Labels that can't handle dust, moisture, chemicals, or repeated wiping will start failing long before the asset is retired. The REWORX-style fix is to choose the substrate and adhesive around the asset's actual environment, then test before mass printing. If the tag doesn't stay attached and readable through normal use, the design was wrong from the start.
A quick diagnosis usually tells you which problem you're facing. Missing scans with otherwise clean assets often point to placement. Duplicate entries point to naming. Tags that curl, fade, or detach point to environment mismatch. Fix the root cause once, and the entire workflow gets easier.
Closing the Loop From Labeling to Responsible Disposal
A labeling system only proves its value if it still works at the final handoff. The same asset ID that helps a technician find a laptop in storage should also let the ITAD team verify wiping status, transfer records, and final disposition. That is what keeps the label useful after the daily inventory work is done.
Why end-of-life traceability matters
Strong records make decommissioning easier to control. Teams can separate reusable equipment from scrap, route devices to the right processing path, and show that sensitive hardware did not vanish into an informal pile. That matters in data center decommissioning, office cleanouts, and facility cleanouts, where dozens of devices can move at once and ownership can blur quickly.
The labeling system also supports sustainability goals. Better records make it easier to send usable equipment toward donation or redeployment, and unrecoverable devices toward responsible electronics recycling. Reworx Recycling works in that space as a donation-based recycling and IT equipment disposal partner, which fits organizations that want disposal to support both compliance and community goals. Their recycling blog also gives teams a practical place to review disposal and data destruction topics before they commit equipment to the next step.
Quick answers for teams making the switch
Can you mix barcode and QR labels in one program? Yes, if the same naming standard and record logic sit underneath both. Mixed formats work best when one format supports quick scans and the other carries richer data for follow-up.
Do smaller businesses need RFID? Not always. Many small and mid-sized teams get solid results from barcode-based asset tags if the naming and placement rules are strict.
How often should labels be checked? Any time assets are moved, wiped, or prepared for disposal, with periodic spot checks on older equipment. Tags fail gradually, so maintenance matters.
How does labeling help sustainability? It keeps usable devices from being lost in the shuffle and helps teams send end-of-life equipment to the right recycling path instead of treating everything the same.
When you are ready to tighten control over asset records and disposal workflows, Reworx Recycling can help you retire equipment responsibly and keep sensitive assets moving through the right path. Visit their recycling blog to review practical guidance on IT equipment disposal, secure data destruction, and recycling options for your next office or data center refresh.
If your business needs a cleaner way to label, track, and retire IT assets, Reworx Recycling can help you connect the workflow from the first asset tag to final disposition. Reach out when you are ready to donate old equipment, schedule a pickup, or build a more reliable ITAD process with Reworx Recycling.