
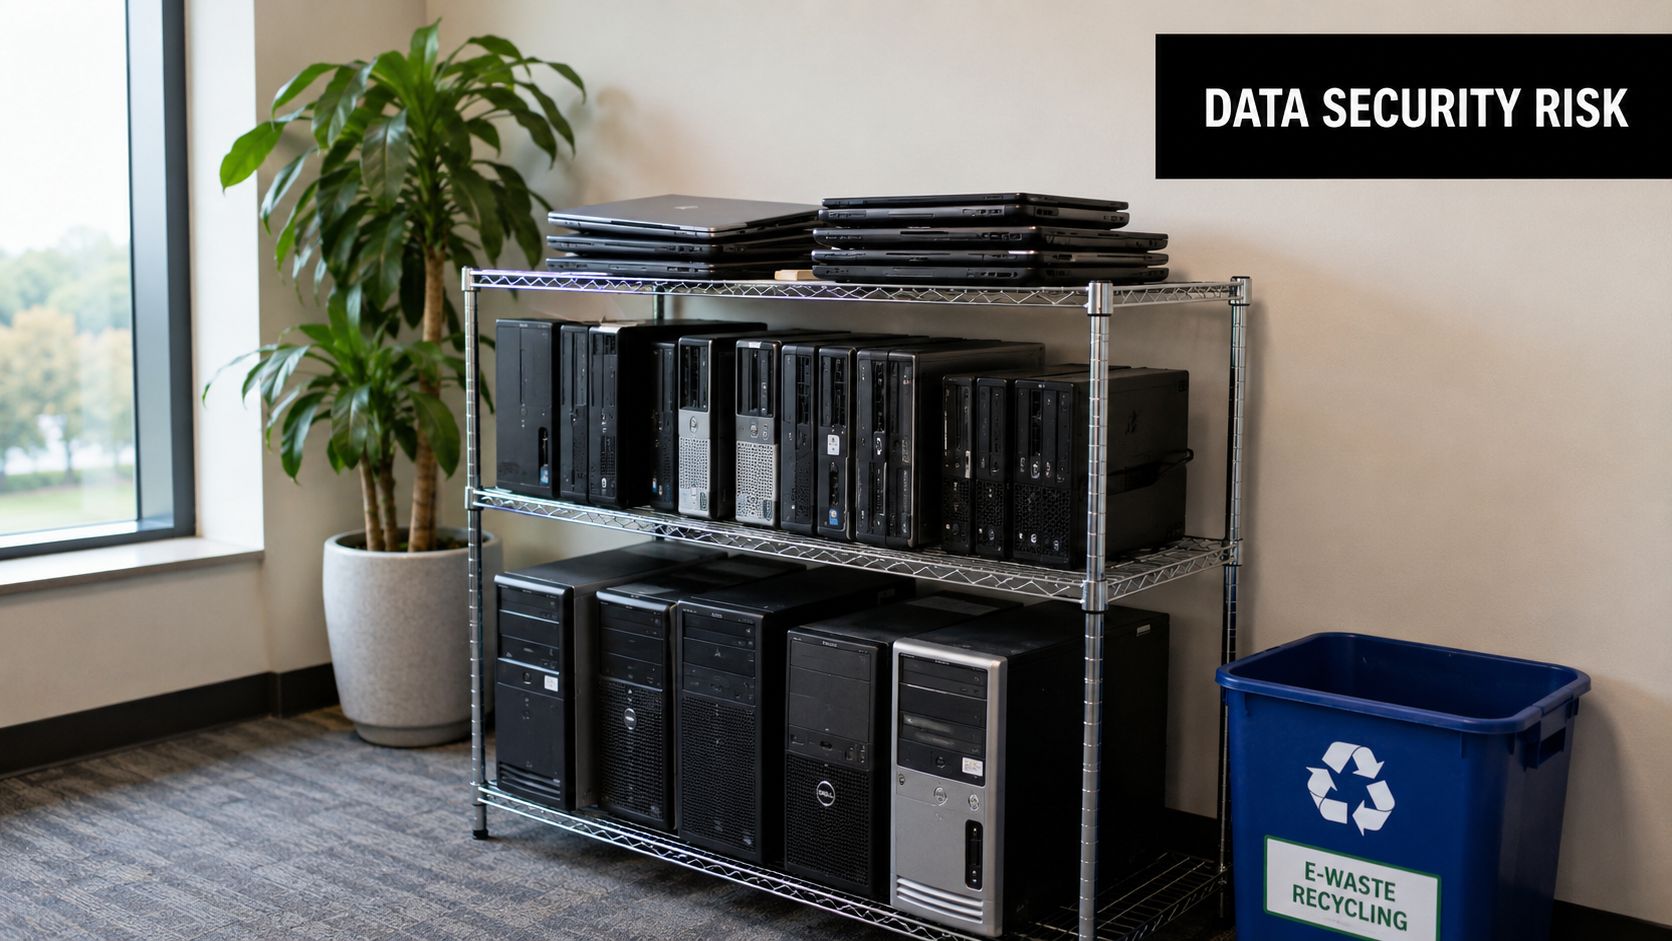
A lot of offices have one. A shelf in the copy room with retired laptops. A cabinet with old desktop towers from the last refresh. A few external drives in a drawer because no one wanted to throw them out without “doing something” about the data first.
That pile isn't just clutter. It's a collection of storage devices that may still hold employee records, contracts, financial files, customer communications, backups, and cached credentials. For an IT manager or facilities lead, taking out a hard drive isn't a minor hardware task. It's the moment an asset moves into the IT asset disposition process, and that shift carries security, compliance, and operational consequences.
Most DIY advice stops at screws and cables. In business settings, that's not enough. The physical removal matters, but so do identification, handling, documentation, secure sanitization, and final disposition. If any one of those steps breaks down, the whole process becomes hard to defend.
Beyond the Screwdriver Why Drive Removal Is a Security Process
The most common mistake is treating a removed drive as if it's already safe. It isn't.
A hard drive is not “empty” just because it has been removed from a computer. The data remains magnetically stored on the disk until it is deliberately erased, overwritten, or destroyed, as explained in this overview of why removed hard drives still retain data. That's why unplugging a drive, boxing it up, or leaving it on a shelf doesn't reduce the underlying data risk.
Removed doesn't mean retired
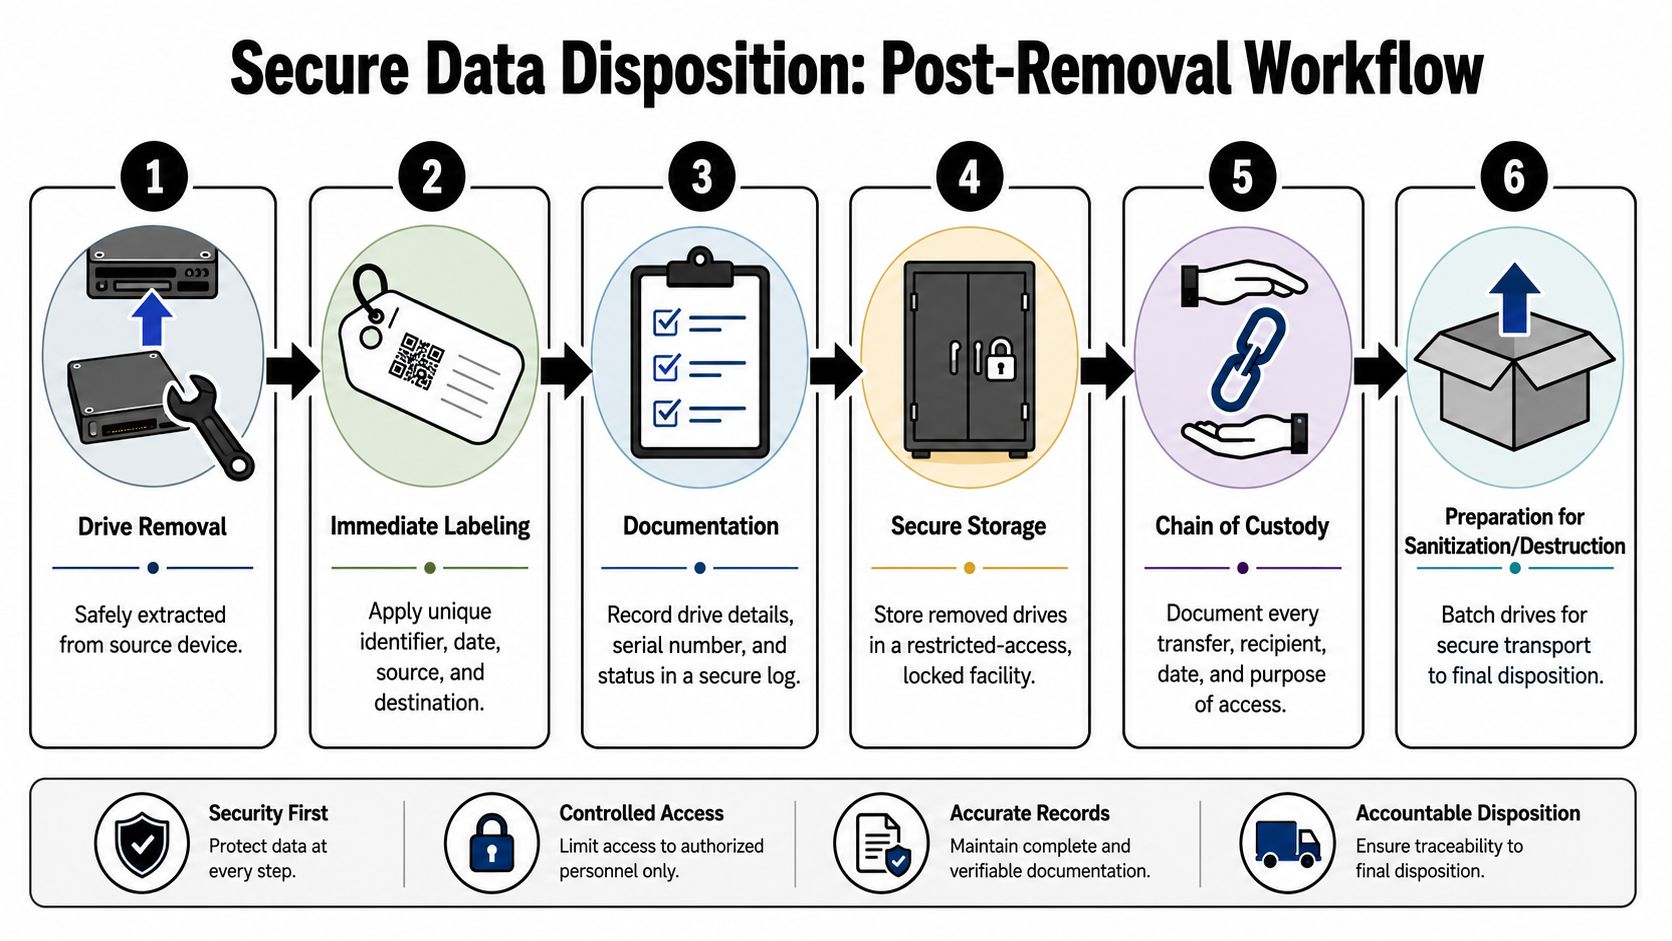
In practice, drive removal is the first controlled handoff in a larger chain. Once the drive comes out, someone in the organization is now responsible for:
- Identifying the source asset so the drive can be tied back to a device and user context
- Preventing casual access while the drive is waiting for final handling
- Choosing a disposition path that matches reuse, recycling, or destruction requirements
- Documenting the event in a way that stands up during audits or internal reviews
Practical rule: If a removed drive can still be connected to another machine, you should treat it as live data-bearing media.
That's the shift many businesses miss. A workstation refresh feels operational. A removed drive makes it a security event.
Why business process matters more than DIY confidence
A technician may know how to open a desktop or slide out a laptop drive. That skill matters, but it's only one part of the job. Risk emerges after the hardware task, when removed media starts moving between desks, bins, carts, offices, or vendors without a documented path.
This is where structured ITAD discipline pays off. Strong programs define who can remove drives, where they go immediately after removal, how they're logged, and what standards govern wiping or destruction. Businesses that want a more formal framework can start with guidance on data security best practices in IT asset disposition.
Treating old equipment as a “tech graveyard” creates ambiguity. Treating it as an ITAD workflow creates control.
Your Toolkit for Safe and Professional Hard Drive Removal
The right workstation prevents two different failures. The first is physical damage to equipment you may want to redeploy, donate, or resell. The second is procedural sloppiness that causes drives, screws, caddies, and labels to get mixed together.
Core tools that belong at the bench
You don't need a huge lab setup, but you do need consistency. A practical kit usually includes:
- Phillips screwdrivers: Most desktops and many laptop access panels still rely on standard Phillips screws.
- Torx drivers: Many business laptops, small form factor PCs, and some drive assemblies use Torx fasteners rather than Phillips.
- Plastic pry tools: These help open clips and panels without gouging housings or snapping tabs.
- Magnetic parts tray: Screws disappear fast during batch work. A tray keeps assemblies together.
- Small labels or asset tags: Drives should be identified as soon as they're removed, not later from memory.
- Anti-static bags: Removed drives need protected storage before wiping, shredding, reuse, or transport.
A clean table matters as much as the tools. If your team is balancing laptops on cardboard boxes or piling removed drives beside power cords and scrap metal, mistakes are going to happen.
ESD control isn't optional if reuse is on the table
Electrostatic discharge is easy to ignore because you can't usually see it happen. That doesn't make it harmless. If a business wants to preserve asset value, donate working systems, or keep components eligible for testing, ESD precautions are part of professional handling.
Use an anti-static wrist strap when practical. Keep drives off carpet, fabric chairs, and improvised surfaces. Place removed media in anti-static packaging rather than loose bins. Even when the end destination is destruction, disciplined handling keeps the process orderly and reduces mix-ups.
A rushed teardown can turn a reusable device into scrap before anyone decides whether it should be wiped, redeployed, or recycled.
Set up the workflow before touching the first machine
The bench should support repeatable work, not one-off improvisation. Before your team starts taking out a hard drive from multiple devices, define the flow.
A simple professional setup looks like this:
| Work area | What happens there |
|---|---|
| Intake zone | Confirm asset identity and mark the device for processing |
| Removal bench | Open the unit, remove the drive, retain brackets and screws |
| Labeling point | Apply the drive identifier immediately |
| Secure holding area | Place removed media in controlled storage pending final disposition |
That structure does two things. It keeps labor moving, and it stops assets from drifting into a gray area where no one is sure what was removed from which machine.
What doesn't work
Three habits create trouble fast:
- Loose-drive batching: Pulling drives first and trying to identify them later
- Mixed hardware piles: Combining laptop drives, desktop drives, caddies, and external enclosures in one container
- Ad hoc staffing: Asking whoever is free to help without giving them a defined process
If this work happens often, assign a standard kit to the task and keep it complete. Professional removal is less about technical heroics and more about repeatability.
A Practical Guide to Removing Desktop and Laptop Drives
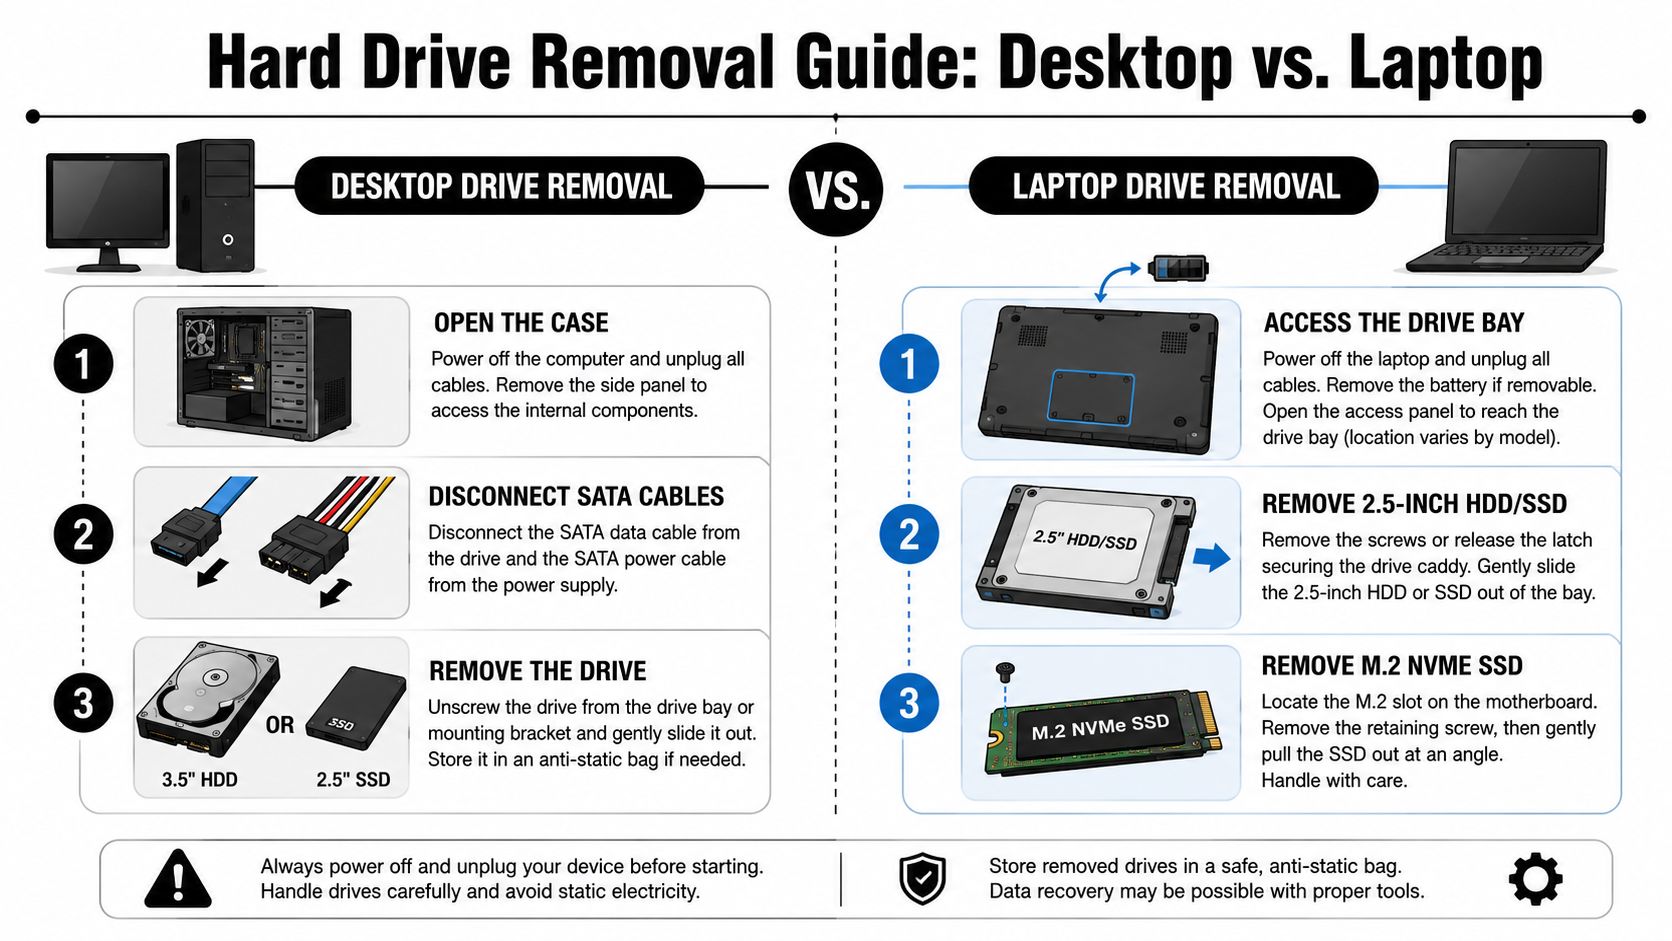
Different device types fail in different ways during removal. Desktop work usually goes wrong because teams rush through cable disconnection or lose mounting hardware. Laptop work usually goes wrong because someone assumes every thin device has a removable 2.5-inch drive bay when many newer systems don't.
Desktop towers and small form factor PCs
A typical desktop drive is easier to access because there's more room to work. The process is usually straightforward:
- Power down and disconnect the unit. Remove AC power and any attached peripherals that might snag while the case is open.
- Open the chassis. Side panels may use thumbscrews, Phillips screws, or a release latch.
- Locate the storage device. In many desktops, this will be a 3.5-inch hard drive or a 2.5-inch SSD mounted in a bracket or cage.
- Disconnect the cables carefully. SATA data and power connectors should come out straight. Don't twist them out.
- Remove the mounting hardware. Some systems use screws, others use tool-less rails or a caddy.
- Keep the bracket with the source device record. This matters if the machine will be repurposed or rebuilt.
Desktop work rewards patience. The damage usually comes from forcing a connector or setting aside caddies and screws without tying them back to the unit.
Standard laptops with 2.5-inch drives
Older and mid-generation business laptops often have a service panel or an accessible bottom cover. Once opened, the 2.5-inch drive is usually mounted in a slim tray or carrier.
Look for a rectangular drive connected through a SATA interface. Remove the retaining screws, slide the drive assembly gently away from the connector, and then lift it out. If there's a metal carrier, keep that carrier with the asset record unless you're certain it's disposable.
A common mistake is pulling upward before sliding the drive clear of the connector. That can damage the interface or bend the caddy.
If the drive doesn't move with light, controlled pressure, stop and verify whether a hidden screw, retention clip, or cable is still holding it.
M.2 and NVMe SSDs need different handling
A lot of online guidance still treats storage as if every machine has a removable spinning disk. That's outdated. The bigger gap today is SSD vs. HDD removal, especially in ultrabooks, mini PCs, and newer business laptops.
For M.2 SSDs, the neutral guidance is simple: the module is released by removing a retention screw and sliding it out, as outlined in this explanation of M.2 SSD removal and SSD-specific disposal considerations. That same source also notes that SSDs are not safely sanitized by degaussing because flash memory isn't affected by magnetic fields. They require secure erase or cryptographic erasure instead.
That changes both the physical and downstream process.
Quick comparison of common office drive types
| Drive type | Typical location | Removal style | Handling note |
|---|---|---|---|
| 3.5-inch HDD | Desktop tower | Unplug SATA cables, remove bracket or screws | Heavier, more shock-sensitive |
| 2.5-inch HDD or SSD | Laptop or desktop bracket | Slide from SATA connector, remove tray | Keep carrier with asset if needed |
| M.2 NVMe SSD | Laptop motherboard or mini PC board | Remove retention screw, slide module out | Small and easy to misplace |
Businesses processing older and newer devices side by side should train staff on these differences before batch work begins. If you're pairing physical removal with final disposition planning, this guide on how to safely destroy data on old computers is a useful companion.
Handling Enterprise Drives Servers and External Storage
Enterprise storage removal is a different discipline from office PC teardown. Server drives may be in hot-swap carriers, tied to RAID groups, or embedded in systems where chain of custody matters as much as the actual extraction. External devices complicate things further because they often hold backup sets that users forgot existed.
Server bays and hot-swap handling
In rack servers, drives are often mounted in front-access carriers with release levers. That design makes replacement efficient, but it can also create false confidence. Just because a drive is easy to pull doesn't mean it's safe to remove casually.
The operational stakes are higher because hard drives remain a major technology category globally. Seagate reports that enterprise storage is projected to grow by 8,528 exabytes from 2023 to 2028, reaching 14 zettabytes by 2028, which matters because each high-capacity device can hold far more sensitive information at decommissioning time, as noted in this summary of hard drive and enterprise storage growth projections.
Before removing anything from a server, confirm four things:
- Array status: A drive may be part of a RAID set, not a standalone media item.
- System state: Some bays support hot-swap, others don't. Follow the hardware policy for that platform.
- Carrier ownership: The tray or sled may need to stay with the server chassis.
- Tracking method: Enterprise media should be logged before it leaves the rack row or server room.
RAID changes the meaning of “one drive”
Pulling one disk from an array doesn't automatically eliminate the underlying data concern. It only changes where part of the data set resides. In decommissioning projects, teams need to map the storage design before removal starts, especially when arrays, backup appliances, and mixed media pools are involved.
Physical security around these environments matters too. Organizations reviewing server-room procedures may find Overton Security's data center protection useful because it frames media handling as part of broader facility controls, not a separate afterthought.
In enterprise work, the drive is rarely the whole story. The storage system, the rack location, and the transfer path all matter.
Don't overlook external storage during office cleanouts
External hard drives are often the least governed devices in a business environment. They sit in desks, conference room credenzas, admin cabinets, and branch offices. Yet they can contain some of the most concentrated data in the building because they were often used for backups, exports, archives, or one-time migrations.
Removal here usually means opening the enclosure only if required for identification, wipe workflow, or destruction prep. If the organization's goal is secure final disposition, the enclosure should still be tied to the same asset log as internal drives. “Just a USB drive” is not a category you want floating outside your process.
For infrastructure teams building a formal retirement workflow, a server decommissioning checklist helps keep server media, accessories, and attached storage from slipping through the cracks.
After Removal Chain of Custody and Secure Labeling
Once the drive is out, the technical task is over. The accountability task begins.
Too many organizations do careful removal and careless handling. That defeats the point. Neutral guidance on end-of-life media management increasingly emphasizes chain of custody, documentation, and choosing between secure erasure and physical destruction based on reuse plans, with destruction treated as only one part of a broader ITAD process, as described in this article on hard drive destruction and post-removal handling.
Label immediately or lose the trail
The best labeling system is the one your team will use every time. It doesn't need to be complicated. It does need to be immediate.
A removed drive should be tagged with enough information to answer basic audit questions later:
- Source asset ID: Which laptop, desktop, server, or enclosure it came from
- Removal date: When the media left the original system
- Handler identity: Who performed or supervised the removal
- Intended path: Pending wipe, pending destruction, testing, or hold status
If your team waits until the end of the day to label media, memory becomes the system. That's not defensible.
Secure storage is part of chain of custody
A labeled drive still needs controlled storage. That can be a locked cabinet, a restricted room, or a locked rolling container designated for data-bearing media. What matters is that access is limited and transfers are logged.
A usable handoff record should answer:
| Question | Example of what to record |
|---|---|
| What moved? | Drive identifier and device type |
| When did it move? | Date and time |
| Who released it? | Staff name or approved custodian |
| Who received it? | Internal team member or downstream vendor |
| Why was it moved? | Wipe, testing, destruction, transport |
This doesn't need to become bureaucratic theater. It needs to be consistent enough that you can reconstruct events if a drive goes missing, a certificate is requested, or a regulator asks how media was controlled after removal.
A drive without a custody record is hard to defend, even if everyone believes it was handled correctly.
Documentation supports reuse as much as destruction
Organizations often associate paperwork with shredding events, but good records matter just as much when the goal is reuse, donation, or redeployment. If a drive is being sanitized rather than destroyed, you still need to know where it came from, what happened to it, and whether the process was completed and verified.
That's where a documented chain of custody process for retired electronics and data-bearing devices becomes useful. It gives IT, facilities, compliance, and sustainability teams a shared record instead of separate spreadsheets and assumptions.
The Final Step Secure Sanitization vs Physical Destruction
The final decision is usually not whether data matters. It's how your organization wants to eliminate the risk while balancing reuse, policy, and sustainability.
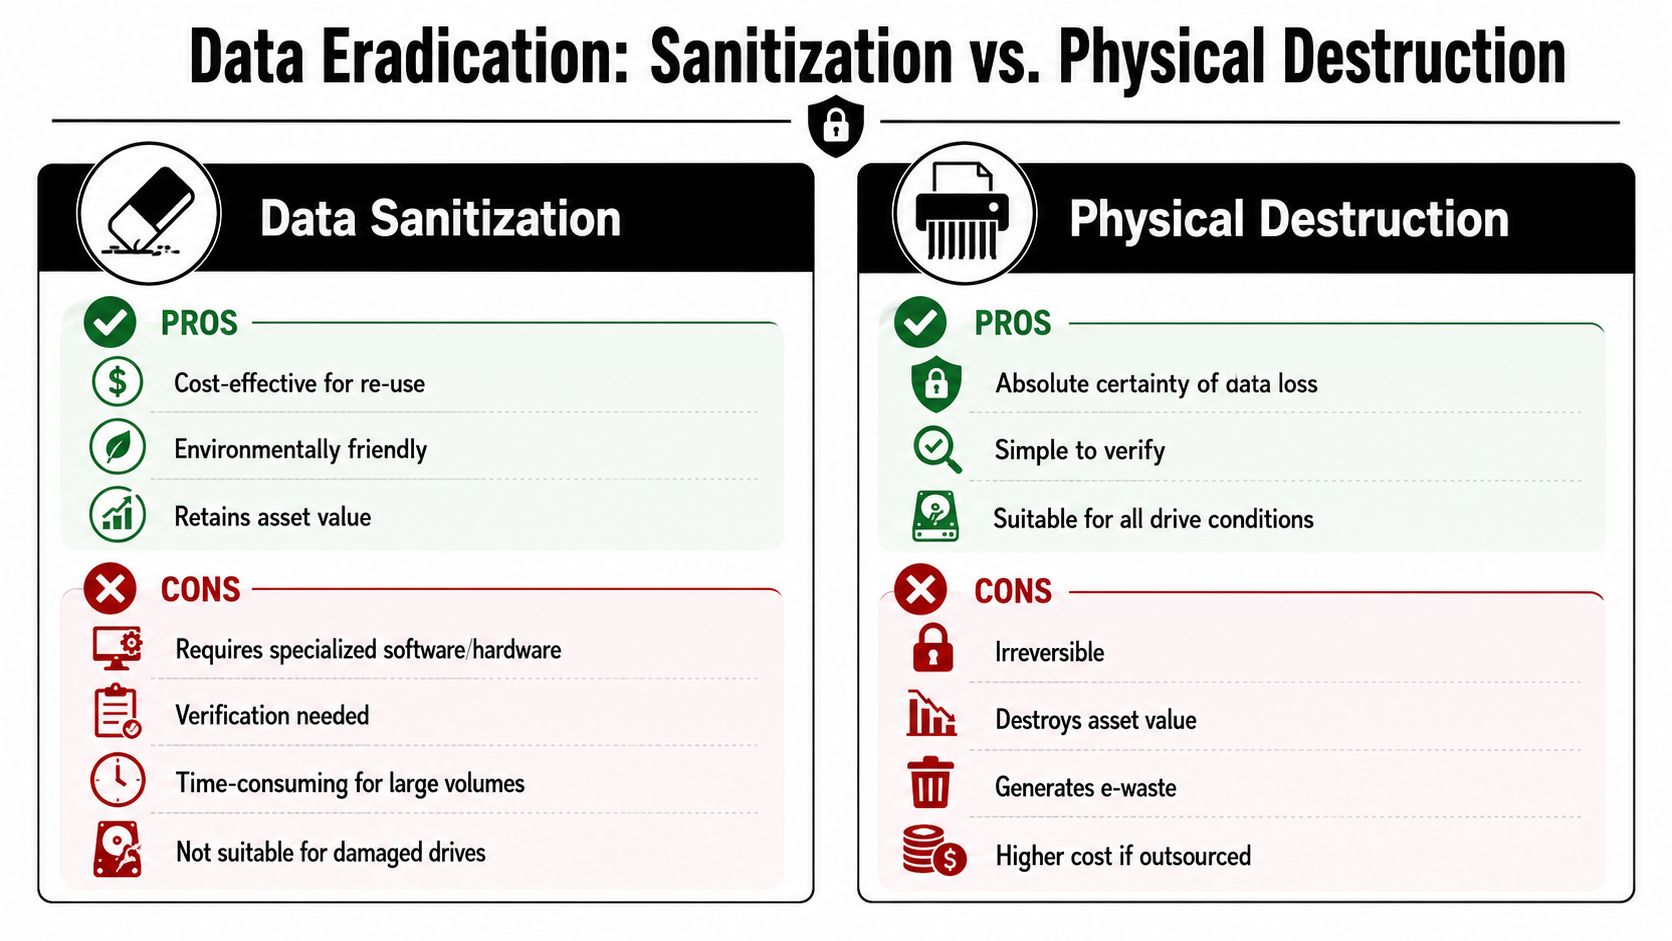
For most HDDs, expert guidance based on NIST media-sanitization standards says a single overwrite pass with a fixed pattern such as zeros is generally sufficient to hinder data recovery on magnetic media, and software-based erasure is usually faster and preserves resale value, while physical destruction is reserved for drives that can't be trusted, can't be powered, or fall under stricter destruction policies, according to this review of overwrite guidance for hard disk sanitization.
When sanitization is the better choice
Sanitization makes sense when the drive is functional, the organization wants to preserve value, and policy allows verified erasure. In those cases, the process should include inventory, correct media identification, overwrite execution, and proof that the wipe completed successfully.
This path is often the better fit for fleets being prepared for resale, redeployment, or donation-based recycling. It supports circular-economy goals because the hardware, or at least the storage media, may remain usable after the data is removed properly.
When destruction is the right call
Physical destruction is the right answer when the drive is damaged, inaccessible, untrusted, or governed by internal rules that require irreversible destruction. It's also the practical fallback when a device won't power on or when hidden areas and media condition make software treatment unreliable in your environment.
The key is not to default to shredding out of habit when a verified wipe would have met the security need and preserved value. But it's equally important not to force a wipe workflow onto media that shouldn't leave the destruction path.
A simple decision frame
- Choose sanitization if the drive works, can be verified, and the organization may reuse or remarket the asset.
- Choose destruction if the drive is failed, suspect, or covered by a destruction-first policy.
- Choose documentation either way because the method matters less if you can't prove what happened.
For organizations that need either path handled as part of a larger electronics recycling or ITAD program, providers such as Reworx Recycling offer services tied to hard drive shredding and data destruction workflows, alongside broader equipment disposition support.
If your team is taking out hard drives during a refresh, office cleanout, server retirement, or equipment donation project, don't stop at removal. Build the full process around secure handling, documented custody, and a final disposition method that fits your policy and sustainability goals. To plan the next step, explore the resources from Reworx Recycling and consider a structured pickup, donation, or ITAD partnership for retired equipment.