A retiring laptop fleet rarely arrives as a neat, labeled package. An IT manager may be facing employee laptops, decommissioned servers, forgotten USB drives, backup media, and a vendor promise that says only “data wiping.” The question isn't whether someone ran a tool. It's whether the organization can prove every device was identified, controlled, processed appropriately, verified, and documented.
A reliable data destruction process treats sanitization as an auditable workflow, not a single button. The method must match the media, the chain of custody must remain intact, and the final records must connect each asset to its outcome. That approach supports responsible IT asset disposition (ITAD), secure recycling, and equipment reuse when reuse is safe.
Why the Data Destruction Process Matters More Than the Tool You Pick
A logistics company with a retiring workforce fleet might have laptops containing employee records, servers holding operational data, and removable drives used by field teams. A contract that promises “data wiping” doesn't answer the questions an auditor will ask later. Which assets were processed? What media did each device contain? Who handled them between pickup and sanitization? Was the result verified?
The tool matters, but the surrounding controls matter more. NIST Special Publication 800-88, first published in 2006 and later revised, defines three sanitization outcomes, Clear, Purge, and Destroy, and frames sanitization as making access to target data infeasible for a given level of effort. The IRS media sanitization guidelines summarize the same framework and identify physical methods such as disintegration, incineration, pulverizing, shredding, and melting.
Practical rule: A wipe report without an asset trail is evidence of an event, not proof that the right device was processed.
A defensible workflow has six connected phases:
- Inventory and classification: Identify every asset and assign its confidentiality level.
- Method selection: Choose Clear, Purge, or Destroy according to the media and risk.
- Physical destruction: Destroy media that can't be reliably sanitized or safely reused.
- Verification: Reconcile serial numbers, reports, inspections, and operator records.
- Certificate issuance: Produce a certificate that ties the documented outcome to each asset.
- Continuous improvement: Review exceptions and refine intake, handling, and vendor controls.
Teams commonly slip at the boundaries. They skip the asset register, overlook shadow-IT laptops, select degaussing for solid-state media, or lose control of equipment during transport. Reworx Recycling's discussion of why secure data destruction matters reinforces the practical point: secure deletion belongs inside the full asset lifecycle, not at the very end as a rushed checklist item.
Phase 1 Inventory and Classification of Every Asset
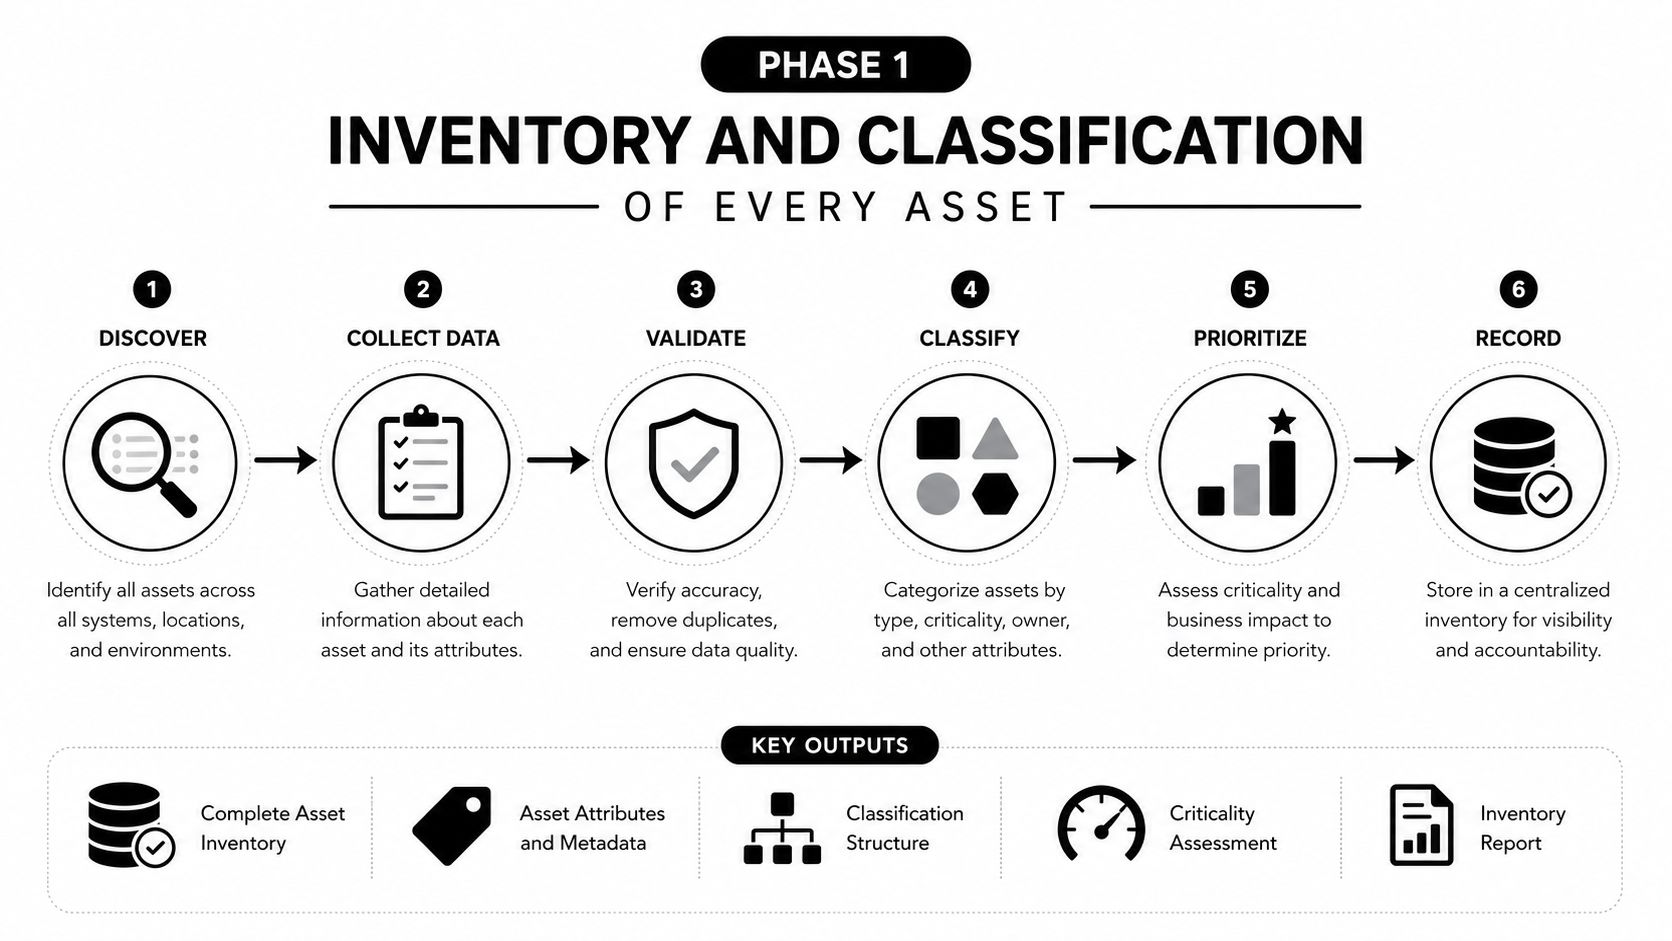
Inventory is the foundation because every later record inherits its accuracy. Start with an asset register that gives each device a unique identity before it leaves the originating department. At minimum, capture the manufacturer, model, serial number, media type, storage capacity, department of origin, physical location, and intended disposition.
Don't rely only on the procurement database. Compare it with endpoint management records, help-desk assignments, server-room lists, copier inventories, and a physical sweep. An unregistered USB drive or a laptop kept in a manager's home can create the exact gap that undermines an otherwise careful program.
Assign a handling tier
Use plain-language categories that staff can apply consistently:
- Public: Media that contains no confidential business or personal information.
- Internal: Ordinary business material, operational files, or employee work product.
- Regulated: Information subject to heightened obligations, such as protected health information, payment data, or sensitive government records.
The tier shouldn't exist only as a label. It should drive the approved method, transport controls, witness requirements, and certificate detail. A regulated device may require witnessed handling from collection through processing, while a public asset may qualify for a less intensive path if verification still meets the organization's risk threshold.
Consider a regional healthcare clinic cataloguing 45 laptops, 12 desktops, and 9 external drives before retirement. Those quantities come from the clinic's example inventory, not a general industry benchmark. The clinic would identify which devices stored protected health information, flag them for controlled handling, and make sure the serial-level register follows them to the processor.
Build the custody record before pickup
Use serialized tags, tamper-evident bags for loose media, sealed transport totes, and a signed handoff log. Record the person releasing the equipment, the person receiving it, the date and time, the seal identifiers, and any exceptions such as a missing label or damaged serial plate.
A practical Freshservice inventory management guide can help teams think through inventory visibility, while Reworx Recycling's asset inventory management service offers a relevant reference point for organizing device records before disposition. The output of Phase 1 is an approved asset register and a custody package, not merely a spreadsheet of equipment.
Phase 2 Choosing the Right Sanitization Method by Media Type
NIST's three outcomes are related, but they aren't interchangeable. Clear uses logical techniques, such as overwriting, to address ordinary recovery efforts. Purge uses methods such as secure erase or degaussing to make recovery infeasible even with advanced equipment. Destroy physically demolishes the media so it can't be reused and recovery must be infeasible even to state-of-the-art laboratory techniques. NIST treats physical destruction as one option, not the default for every asset, as explained in this overview of NIST SP 800-88 media sanitization.
Media type determines which outcome is realistic. A functioning spinning hard drive may support a verified overwrite. A self-encrypting SSD or NVMe drive may support cryptographic erase when its storage controller and encryption design allow it. Magnetic tape and some legacy hard drives may be candidates for degaussing. Flash storage that can't be reliably sanitized in place may need shredding or disintegration.
| Media Type | Clear, Software Overwrite | Purge, Crypto Erase / Degauss | Destroy, Shred / Disintegrate |
|---|---|---|---|
| Spinning hard drive | Verified overwrite where supported | Degaussing or secure erase where appropriate | Shredding or disintegration |
| Self-encrypting SSD | Not automatically equivalent to HDD overwriting | Cryptographic erase when the device supports and verifies it | Physical destruction when verification isn't possible |
| NVMe drive | Standard overwrite requires careful validation | Cryptographic erase when supported by the device | Shredding or disintegration for failed or uncertain media |
| Magnetic tape | Generally not the primary choice | Degaussing may be appropriate | Physical destruction when required |
| USB flash media | Overwrite may not address every storage area | Use a validated device-specific approach | Physical destruction when sanitization can't be verified |
This isn't a menu of interchangeable services. Wear leveling, over-provisioned areas, controller behavior, and encryption keys can affect what a software process reaches on solid-state media. Degaussing also targets magnetic storage, so it isn't a universal answer for SSDs, NVMe drives, or flash media.
The decision rule is straightforward: if the media can't be verified as sanitized, escalate to physical destruction. Reworx Recycling's data sanitization methods provide a useful service reference for teams comparing reuse-preserving sanitization with destruction. The output of this phase should be a device-level disposition decision, including the selected outcome, method, reason, and fallback if the first method fails.
Phase 3 Physical Destruction and Secure Handling
Physical destruction is appropriate when a drive has failed, encryption keys are unavailable, the media is headed directly to recycling, or the organization requires Destroy-level assurance. The process must still be controlled. Feeding devices into a machine without confirming the asset list, media type, and downstream safety conditions creates a different set of risks.
NIST doesn't prescribe one universal commercial hard-drive particle size. Industry references sometimes cite NSA-aligned targets for classified environments, but the practical requirement is to align the equipment and output with the media and assurance level. A label that says “shredded” isn't enough if the resulting pieces leave storage components substantially intact.
Separate media before the machine starts
Keep mixed-media batches separate. Hard-drive platters, SSD NAND packages, tapes, optical media, lithium batteries, and CRT components don't present the same processing or downstream recycling profile. Solid-state destruction must address the storage chips, not puncture or break the outer casing. CISA describes solid-state destruction as crushing, shredding, or disintegration of storage chip memory in its guidance on proper electronic-device disposal.
Use sealed totes between staging and destruction areas. Apply tamper-evident seals, record their identifiers against the asset register, and require documented handoffs. Keep trained witnesses present for the destruction cycle when the classification policy calls for it, and record the operator, witness, machine, batch, and exception details.
| Media Type | Confidential / PII | Sensitive / Regulated | Top Secret / Highly Regulated |
|---|---|---|---|
| HDD platters | Use an approved fragment or destruction specification tied to policy | Use smaller, validated output where required by the governing policy | Follow the applicable classified-media specification and inspection protocol |
| SSD and NVMe | Cut or shred through the storage packages | Confirm NAND packages are physically compromised and inspect output | Use the strictest approved chip-destruction specification and witnessed controls |
| Magnetic tape | Use an approved magnetic-media destruction method | Combine validated sanitization with physical destruction when policy requires it | Apply the governing high-assurance media specification |
| USB flash media | Physically destroy the memory components when uncertain | Use controlled, witnessed destruction and serial reconciliation | Apply the strictest approved process for the information category |
Battery-containing devices and CRTs need segregation before shredding to protect workers and downstream processors. Reworx Recycling's equipment destruction best practices offer a useful reference for planning the physical phase. The output should include destroyed media, a controlled residue stream, and records showing that no whole asset bypassed the process.
Phase 4 Verification and Chain-of-Custody Documentation
Most programs don't fail because the shredder stopped or the wipe software couldn't start. They fail because no one can prove which asset went through which outcome. Verification closes that evidentiary gap by attaching objective records to every item in the Phase 1 register.
For wiped media, retain the sanitization report and check that it identifies the asset serial number, firmware revision, start time, end time, and pass count where the tool provides those fields. For physical destruction, inspect the output, document particle or component conformance against the approved specification, and compare the processed output with the input batch so a whole device can't disappear from the record.
Reconcile three checkpoints
Scan or photograph each serial number at intake, after sanitization or destruction, and during certificate assembly. The images should be legible, and the register should identify the person who performed each reconciliation. A photo taken at an unreadable angle isn't useful evidence.
Common failures include:
- Serial mismatches: The certificate lists a device that wasn't on the intake manifest.
- Missing signatures: The operator or witness completed the work but didn't sign the custody record.
- Unclear images: Barcodes or serial plates can't be read during an audit.
- Unresolved exceptions: A damaged label is carried forward without an alternate identifier or documented decision.
Audit test: Start with any certificate and trace it back to the handoff, intake scan, processing record, inspection, and final disposition.
Maintain one source-of-truth register. Reconcile it before a certificate is printed, rather than allowing separate spreadsheets at the client site, transport stage, and processing facility to drift apart. Teams evaluating digital trust controls may also benefit from this feature comparison of verification services, especially when certificates need controlled access and verifiable issuance records.
Phase 5 Certificate Issuance and Continuous Improvement
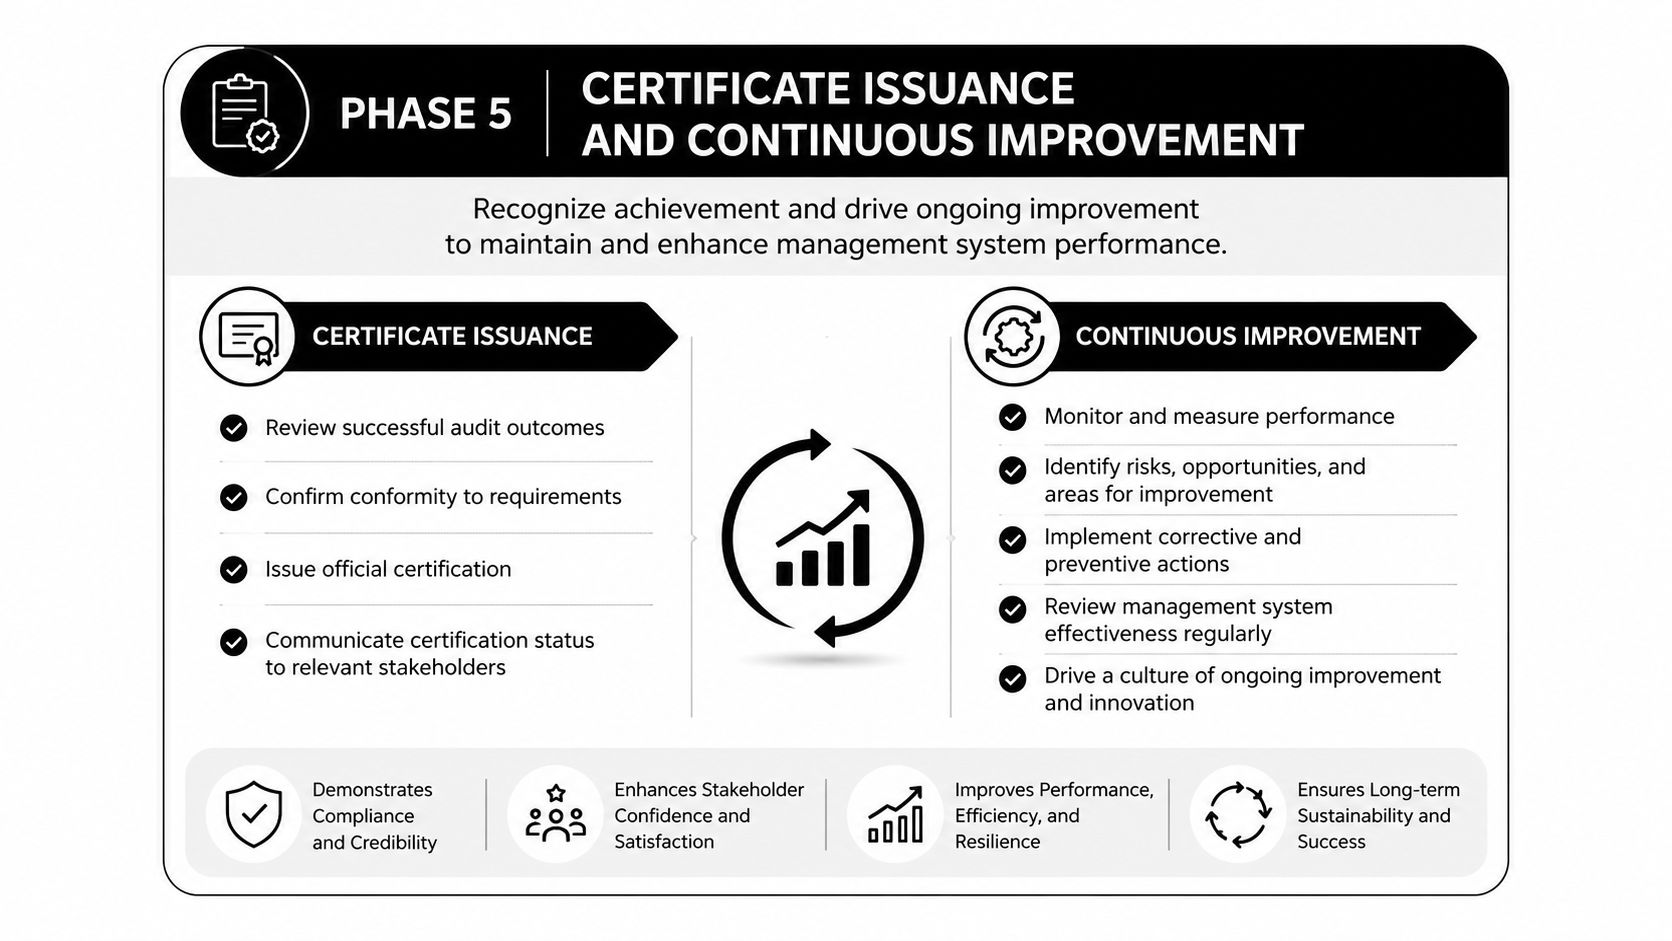
A certificate of destruction is the record an auditor, customer, or regulator is likely to request. A generic statement that “all equipment was destroyed” leaves too many questions unanswered. The document should identify what happened, when it happened, who performed it, and which assets the statement covers.
A defensible certificate should include:
- Unique certificate ID: Use a traceable identifier connected to the project and manifest.
- Destruction date: Record the date and time in an unambiguous format.
- Processor details: Include the processor's name and address.
- Asset manifest: List every serial number or attach the complete reconciled inventory.
- Method statement: Identify Clear, Purge, Destroy, shredding, degaussing, crushing, or another approved method, with relevant media specifications.
- Attestations: Capture technician and witness names and signatures.
- Downstream disposition: State whether the material was prepared for reuse, recycling, or another controlled outcome.
Store certificates for the full period required by the organization's data-retention obligations, then apply the organization's approved archival policy. Index records by client, asset class, and certificate ID so retrieval is practical during an audit. The destruction certificate template can help teams identify the fields their own documentation should contain.
Review the workflow, not just the paperwork
Run recurring reviews against the same process used for each project. Examine cycle time, exception patterns by media type, incomplete records, and customer complaints. Feed those findings back into the intake rules, especially where teams repeatedly discover unregistered devices, unclear ownership, or media that wasn't classified correctly.
Environmental compliance belongs in the review too. The EPA's electronics stewardship regulations notes that 25 states plus the District of Columbia have electronics recycling laws, so requirements can vary by jurisdiction. California classifies e-waste as universal waste, requires delivery to an authorized handler, and says unauthorized people can't smash or destroy e-waste because hazardous dust and debris may result, as described by the California Department of Toxic Substances Control.
A provider such as Reworx Recycling can connect secure data destruction with electronics recycling, business pickups, equipment decommissioning, and donation-based recycling. That combination helps organizations decide which assets require destruction and which can safely support reuse, community technology donations, or responsible material recovery.
Reworx Recycling helps businesses plan serialized asset handling, secure data destruction, equipment pickups, electronics recycling, and responsible ITAD outcomes, with documentation for completed destruction and recycling activities. Visit Reworx Recycling to learn how to donate old equipment, schedule a business pickup, or discuss a secure disposition partnership.